
CoSchedule vs SmarterQueue: What Is Better For You?
This post may contain affiliate links, my full disclosure can be read here. As an Amazon Associate I earn from qualifying purchases.
Is SmarterQueue or CoSchedule the best social media scheduler for you? Find out the similarities and differences here to help you make the best choice, and how to switch from CoSchedule to SmarterQueue too.
I’ve been using CoSchedule daily now for 4 years and I’ve been very happy with it overall, but I’m always on the lookout for the best tools to make blogging easier.
I’ve heard so many good things about SmarterQueue that I decided to try it out and I’m so glad I did.
I’m often asked by blogging friends what the best way to simplify their social media promotion is and I’ve always recommended CoSchedule.

But I know it can be a little pricey, especially if you are just getting started. After all, CoSchedule starts at $40 a month but SmarterQueue starts at just $19 per month.
Since I love testing out new tools, I decided to try out SmarterQueue for a while and see how it compared to CoSchedule. Which one would be better for planning social media content and evergreen sharing?
Let’s start by having a quick overview of each service and then dive into the best social media features of each scheduler.
CoSchedule Overview
Contents
CoSchedule is more than just a social media scheduler. It connects to your WordPress blog and acts as a content calendar. It has many integrations including Evernote and Google Drive for importing blog posts that you can write and publish to WordPress right inside of CoSchedule.
With this blog integration, your social shares are connected right to the blog post so if you change the publish date of the post all your social shares will automatically be moved and rescheduled too.
As you build social media messages you can add your posts to ReQueue groups that will automatically fill in the gaps in your social media posting schedule.
SmarterQueue Overview
SmarterQueue is a social media scheduler that lets you plan seasonal content promotions but also has a strong focus on helping you recycle evergreen posts.
You set up your own custom social media schedule and tell SmarterQueue when you would like your content shared and on what accounts.
When you add new content you are given the option of scheduling a specific date and time to post it or adding it to your queue to trickle out with the rest of your content.
How SmarterQueue Works
When you first log in to SmarterQueue it’s really easy to get your account up and running in just a few minutes.
You need to:
- Connect your social media accounts
- Setup topic categories
- Make your posting schedule
- Add your content
SmarterQueue Social Media Accounts
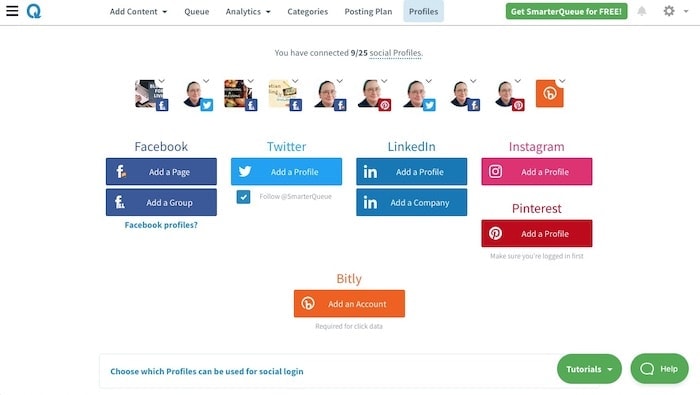
The first thing to do is decide what social profiles you want to add. Currently, SmarterQueue supports these accounts:
- Facebook: Pages and groups that you are an admin of
- Pinterest
At this time Instagram posts do not automatically get shared but are pushed to your phone with the SmarterQueue app.
You can also connect your Bitly account to use for link shortening and tracking stats on your posts.
Social Media Categories

Categories are used to group types of content together and share it out to your accounts. Think of it like a bucket you are filling up with content to share.
When you first sign up to SmarterQueue they give you default categories to use, you can leave them as is or edit them and also create new categories that fit your blog content.
Some that I use are:
- SFB Posts
- PH posts
- Articles
- Self Promotion
- Tips
- Inspiration
- Affiliates
Categories can also be color coded and that really helps to understand your posting schedule when you are setting up your calendar.
You can choose between an evergreen category or a seasonal category. With seasonal ones, you can set an automatic start and stop date for sharing any messages inside these groups.
Setting up categories that share conversation starters to your Facebook groups each day is really easy too.
Create Your Social Media Schedule
Creating a posting schedule in SmarterQueue is really easy! You can do this when you first sign up and are working through the startup guide or at a later time.
Just go to the “Posting Plan” tab, here you will see a monthly calendar. To create your posting schedule all you have to do is add your categories to the time slots you want on the calendar.
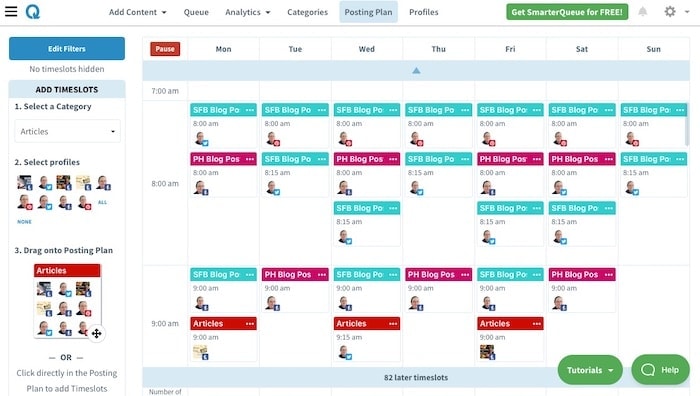
In the left sidebar, you’ll see a drop-down menu that lists your categories. Select the one you want, for example, “Articles”. Then under that click on the social profiles, you want to schedule. Then you simply drag and drop it over to the calendar.
Do this for each category and profile, don’t worry if your calendar starts to look a little busy you can hide content from view by clicking on the “Edit Filters” button above the sidebar.
Adding Content To SmarterQueue
Once you’ve set up your accounts, made your content categories, and schedule it’s time to start adding content to share.
Adding a new post is really easy.

To add a new post click on the “Add Content” menu and select “write a post”. Then select what category this post is for, and what social media account you want to send it to.
You can select as many social media accounts as you want.
Paste the link to your blog post into the social message and it will automatically create a preview of your post.

You can turn on and off bitly link shortening, and Google UTM tracking, and choose between a link or photo post.
You can even pull in images right from your post and add them to your SmarterQueue photo gallery. Don’t have a good image to use? No problem!
SmarterQueue integrates with Unsplash, Pixabay, and Giphy you can quickly search for an image and add it to your post. You can add multiple images too and share them all as part of the same message or use the variation option.

Variations are a feature of SmarterQueue that I’ve fallen in love with! This lets you add multiple text descriptions to the same social media share and multiple images.
Then each time that message comes up to be shared in your content queue it shares a different version by mixing and matching the text and images together. It really is pretty cool!
I’ve been using this feature a lot by writing about 6 social messages and adding a few images. The result is over 20 different social media post combinations.
That alone has been saving me so much time!
Another feature of the post creation is the snippet feature. With this, you can create reusable text phrases you add to posts often. I mostly use this for saving Twitter and Instagram tags.
They even have an option to add 5 blank lines above your tags, perfect for Instagram with just one click.
Ok, once you’ve got your own content setup you’ll want to start sharing other peoples content too. But you don’t want to share just any content you want to make sure it’s things your readers will love right?
This is another area that SmarterQueue really shines!
They have multiple ways of finding popular content to share on your social media.
You can import your feeds from Feedly and add messages one at a time or in bulk to your post categories.
You can also simply drop the link to your favourite blogs and it will automatically find their feed and pull in their latest posts to share too.
But what about content that is already on social media?
They make it really easy to find popular content to share. You can search Facebook pages for their top content and schedule it to be re-shared to your pages.
You can search for content on Twitter, search hashtags, or user profiles and share content to your Twitter or any social media account. You can even retweet directly from inside SmarterQueue.
If you have blogs and profiles you like to share from often you can save them as sources, making it quick and easy to find content to fill up your queue later.
Pros
- Easy to set up and get started
- Budget-friendly
- Great control over when queued messages post
- Easy to import social media content from your accounts
- Easy to import content from blogs, Feedly and other sources to share.
Cons
- Doesn’t integrate with WordPress but it is listed on their Feature Request page so hopefully, that will come!
CoSchedule How It Works
CoSchedule offers many features including syncing with WordPress blogs to write and publish content, working as a team organizer, and social media calendar.
It’s a great service that I’ve used to manage multiple blogs for years.
One of the features they offer is called ReQueue and it’s similar to SmarterQueue but a little different.
When you first start using CoSchedule, ReQueue isn’t turned on by default. This actually makes sense because it’s meant for resharing content you’ve already published not sharing new content.
How To Setup ReQueue
To turn it on go to the ReQueue option in your left sidebar menu and you will find the option to turn on ReQueue.

Then you need to set how often CoSchedule is allowed to send out the same message each month. I have this set to 2 times per month. These are all part of the global settings.
Once you have that set you need to select what time slots and days you want CoSchedule to have available to send out recycled messages. This is under the “Intelligent group settings”.

To do this just click on the time blocks on the calendar, they will turn green to show they are active.

You then have one more setting to configure. Decide how often you want the ReQueue posts to go out to each of your social media profile.
Once that is all set up you can create groups based on topic and add your content to the groups.
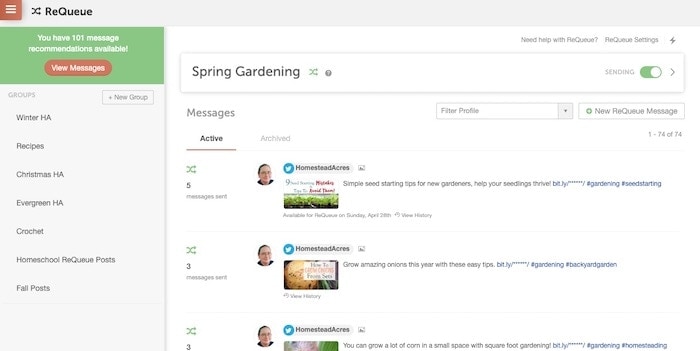
This can be done when you first create the social message or later because CoSchedule will show you what your most popular messages have been and prompt you to add them to a ReQueue group.
In CoSchedule most of your social media posts are done from standalone posts or social media campaigns. These are schedules you create that share content out over a specific number of days.
In CoSchedule you decide what days these posts go out on and set a time, or leave it as best time and CoSchedule will decide when to post it.
Your ReQueue posts are separate from this, they are really used to fill in gaps in your social media posting calendar when you don’t have a lot of new content going out.
Just like with SmarterQueue you can set stop and start dates for ReQueue groups so your seasonal groups will start and stop sharing automatically for you.
You can also create groups that post at the same time every day. This is great if you run a Facebook group with themes that you post at specific times.
Pros
- Integrates with WordPress
- You can write and publish blog posts to WordPress
- Integrates with Evernote, Google Docs and many other services
- Integrates with Active Campaign, Constant Contact, and MailChimp for writing newsletters within CoSchedule and sending to your newsletter service.
- Recycles evergreen posts but has limited customization
- You can limit how often recycled posts go out each month and how many posts to each profile.
Cons
- Only integrates with WordPress no other blogging platforms.
- Doesn’t work for making newsletters with ConvertKit my favourite newsletter service.
- Doesn’t let you customize the exact time a ReQueue message is posted. It just randomly fills in the gaps it thinks you have in your posting schedule.
- CoSchedule has a higher learning curve, it’s not as intuitive to learn.
How To Convert From ReQueue To SmarterQueue
I’ve you’ve been using CoSchedule for a while and want to switch to SmarterQueue there is a way to import your social media posts.
Unfortunately, CoSchedule doesn’t have a way to export a spreadsheet of posts you’ve created inside of it (SmarterQueue does). But SmarterQueue can both detect your posting schedule from your social media profiles and import posts you’ve already shared there before.
Just follow these steps to import the social media content you already published with CoSchedule (or any other scheduler) into SmarterQueue.
Go to the “Add Content” option in the top menu and select “Find Content”. Click in the search bar on that page and it will show all of the social media accounts you’ve already connected.

Click on the account you want to import from. It will load your most recent posts. More posts can be found if you scroll to the bottom and click on “Load More Posts” option.
You can even add filters to search for specific words in your posts. This is handy if you want to bulk add posts to different categories.
For example on my homesteading blog, I might want to search for any Facebook posts with “gardening” or “garden” and import those to a different category than recipe posts.
Once you have your posts listed you can import one post at a time by clicking the Share+ button but in this case, you probably want to import a lot of content at once.

Look in the top right of the results page, and change the import mode to “Bulk”. This will let you add a lot of posts at the same time.
When bulk mode is turned on by default all of the social media posts are selected. If there are any you don’t want to import just unselect them.
You can choose what category each post will go into, the accounts to add each post to and if you want the message to be shared once or added to the queue to be shared multiple times.
There is also the option to edit the text of the post in the bulk import. With this option, the same text will be used for all the social profiles that you share this content to.
But after it’s been imported to your categories you can customize the text for different social accounts separately.
CoSchedule vs SmarterQueue: Should You Use SmarterQueue Or CoSchedule?
Only you can decide what the best social media manager is for your needs. Both CoSchedule and SmarterQueue are great choices!
But let’s summarize the different features between them, that always helps me make the best choice.
If you are looking for an all in one content calendar that integrates with WordPress, lets you create social share messages attached to draft blog posts that will automatically reschedule if you change the blog posting date CoSchedule is a better fit for you.
With CoSchedule ReQueue is used more as filler content and not meant to be your main posting schedule.
If you want a really easy and budget-friendly social media scheduler SmarterQueue could be a better choice.
It took me only a few minutes to set up my account and posting schedule. Once started I was able to create months worth of social messages very quickly!
SmarterQueue will work well for you if you want evergreen and seasonal queue groups to be your main posting method but also lets you post messages at specific times.
If I had to choose only one to use, right now I’d have to pick SmarterQueue.
Even after using CoSchedule daily for 4 years, I found SmarterQueue easier to use. It’s set up very intuitively and I love how the color coding works. I’m a very visual person so being able to set custom colors really helps me stay organized.
I love that SmarterQueue makes it easy for me to choose between posting a message at an exact time or just adding it to the top or bottom of my queue. This is something I struggled with when sharing other peoples content with CoSchedule.
In CoSchedule you normally use their Chrome browser app to schedule blog posts. When you do this you have to pick the date you want it posted on. I always found this a problem because I like to schedule months in advance.
Often I found I scheduled more content from other sources to go out each day than I really wanted. I was always trying to scroll through the calendar and dragging content around to balance the days out better.
With SmarterQueue I simply add great articles to my articles queue if I don’t care what date it’s posted on, you can do this from their browser button or in there find the content area.
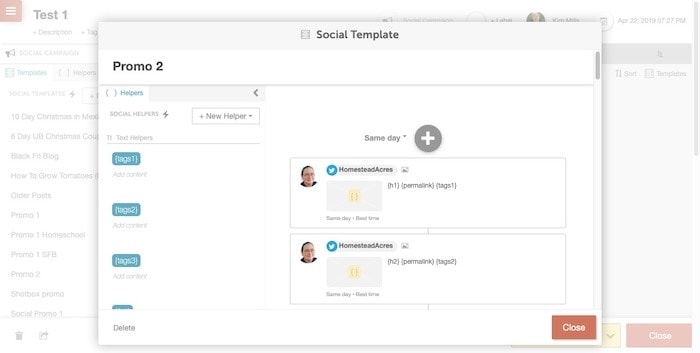
When you write social media posts for your blog posts in CoSchedule it’s really important to create templates that contain place holder helpers, as well as a posting schedule.
This is then attached to a new blog post. Then you add your tweets and other text messages to the text helpers, images to the image helpers.
These helpers then auto-fill the templates you set up manually. This creates a variety of different messages that will be shared out to your accounts.
This has been a real time saver for me over the years, but it’s a little clunky and a lot of work each time you want to set up a new social sharing schedule in CoSchedule.
With SmarterQueue you can add multiple posts to your queue for each blog post you write or uses there variations option I mentioned earlier. I’ve really been finding the variations a real timesaver!
This way of sharing lets me add the images I want to the post both my own and images from free online sources. Then as many text variations as I want and it will combine them into multiple unique messages.
I love that each time a message is shared it will look different, but it actually takes me LESS time to set up.
I simply love this.
Want to try out CoSchedule? Sign up for a free trial here.
Does SmarterQueue sound like a good fit for you? Sign up with my link and you will get a 30-day free trial, that’s 2 weeks longer than their normal trial period.
